I have been trying to find tutorials on how to do ssao in glsl but frankly most of them were not very good. I had to take ideas from several places to make things work properly. But finally I had a solution.
SSAO stands for screen space ambient occlusion. It is an approximation for how light falls on an object and how areas that are dense with relief are more occluded than completely flat areas. Corners are more occluded than walls and areas that are underneath an object that is hovering close to the ground are darker than areas that are fully in the open.
 This is not to be confused with shadowing. SSAO is not shadowing in the traditional sense. It is instead a way to produce local shadows that bring forward the details.
The way I chose to implement this is actually as a step in my deferred renderer implementation. It was actually a very easy addition to the deferred renderer approach because both normals and positions were already precalculated from the deferred rendering pass and so all data that was necessary to do ssao was already there.
Even though it is beyond the scope of this article how to do deferred rendering, I will still provide a quick explanation for how it is done because it will hopefully make it more clear where the ssao has to be put. Basically what I do is render the whole scene first into four different textures. I separate diffuse, point position, point normal in eye space and point specular. This is done by doing a render to texture into four different FBOs at the same time. Look up ”multiple render targets” for more info on how this is done. The data has to be stored in a 32bit float textures. You have to set this ”internalType” when creating the opengl textures for rendering because positions and normals are floats and ordinary 8bit/channel textures lack the precision for storing floating point positions.
One cool detail in this is that even bump mapped surfaces can be correctly written to the screen normal map. To do this, simply compute the tangent tbn matrix and multiply the normals in the bump map with it to convert them to eye space. Then write this value to the normals texture.
Once the diffuse, positions, normals and speculars are baked into the four textures, I do the lighting pass where I compute light contribution for each light. It is here that ssao step can easily be plugged in. It is important to note that in this stage, what we are doing is rendering a screen sized quad on the screen using this shader and the four textures that we have produced earlier. There is no other scene geometry passed to this step. Thus the vertex shader is in this case a simple pass though vertex shader.
Here is the final SSAO shader I ended up with:
uniform sampler2D diffuse;
uniform sampler2D position;
uniform sampler2D normal;
uniform sampler2D specular;
// a simple random generator (taken from a post on StackOverflow). co is seed.
float rand(vec2 co){
return fract(sin(dot(co.xy ,vec2(12.9898,78.233))) * 43758.5453);
}
float doAmbientOcclusion(vec2 tcoord, vec2 uv, vec3 p, vec3 cnorm)
{
float scale = 0.5, bias = 0.1, intensity = 3;
vec3 diff = texture2D(position, tcoord + uv).xyz – p;
vec3 v = normalize(diff);
float d = length(diff) * scale;
return max(0.0,dot(cnorm,v)-bias)*(1.0/(1.0+d))* intensity;
}
float ambientOcclusion(){
vec2 texCoord = gl_TexCoord[0].xy;
vec3 p = texture2D(position, texCoord.xy).xyz;
vec3 n = texture2D(normal, texCoord.xy).xyz;
vec2 rnd = normalize(vec2(rand(p.xy), rand(n.xy)));
float ao = 0.0f;
float rad = 1.0/p.z;
vec2 vec[4];
vec[0] = vec2(1.0,0.0);
vec[1] = vec2(-1.0,0.0);
vec[2] = vec2(0.0,1.0);
vec[3] = vec2(0.0,-1.0);
int iterations = 4;
for (int j = 0; j < iterations; ++j)
{
vec2 coord1 = reflect(vec[j],rnd)*rad;
vec2 coord2 = vec2(coord1.x*0.707 – coord1.y*0.707,
coord1.x*0.707 + coord1.y*0.707);
ao += doAmbientOcclusion(texCoord.xy,coord1*0.25, p, n);
ao += doAmbientOcclusion(texCoord.xy,coord2*0.5, p, n);
ao += doAmbientOcclusion(texCoord.xy,coord1*0.75, p, n);
ao += doAmbientOcclusion(texCoord.xy,coord2, p, n);
}
ao/= float(iterations)*4.0;
return 1.0 – ao;
}
void main()
{
gl_FragColor = vec4(0, 0, 0, 1);
for (int light= 0; light < gl_MaxLights; light++){
// do lighting calculations here….
// …
gl_FragColor += lightContribution;
}
// finally add in the ao term
gl_FragColor *= vec4(ambientOcclusion());
}
And the result with lighting:
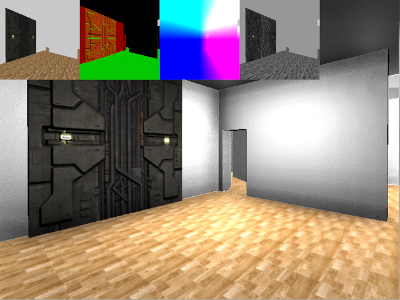 There are a couple of things that are apparent right away – first of all the ssao map will have to be filtered in order to remove artifacts from it. You can also adjust the scale, intensity and bias parameters in the doAmbientOcclusion routine to modify how the ssao looks. Shadows have not been implemented yet.
More reading:
